Water that shows up near a rooftop HVAC unit is one of the most common and most misdiagnosed leaks on a commercial roof. Before anyone reaches for a tube of sealant, it pays to know what curb flashing actually is, how to tell a real flashing breach from harmless condensate, and what a lasting repair looks like. This guide walks through identification, diagnosis, repair, and prevention.
What is HVAC curb flashing, and why does it leak?
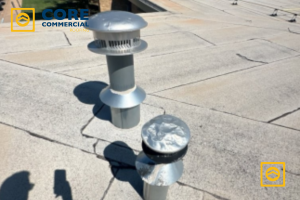
HVAC curb flashing is the waterproofing detail that seals the joint between the roof membrane and the raised metal curb a rooftop unit sits on. It leaks because that joint is a transition between two materials that expand, vibrate, and age at different rates.
The detail has three parts. The base flashing is the roof membrane turned up the vertical face of the curb. The counterflashing laps over the top of that base flashing so water running down the unit can’t get behind it — and on most rooftop units, the equipment’s own metal housing serves
as the counterflashing. A cant strip softens the 90-degree angle at the base so the membrane isn’t forced into a sharp bend that cracks over time.
When any one of those elements is wrong, water finds the gap. That’s why curbs leak more than open field membrane: they concentrate seams, fasteners, corners, and sealant lines into a small footprint, and every one of those is a potential entry point. It’s also why NRCA recommends a sheet-metal counterflashing cover on curb-type details rather than relying on sealant alone.
Is the water a curb flashing leak or just HVAC condensate?
If the water appears during or right after rain, it’s almost certainly a curb flashing or membrane breach; if it shows up in hot, dry weather while the unit is running, it’s probably HVAC condensate. Matching the leak to its trigger is the fastest way to tell the two apart.
Rooftop units produce condensate as warm air crosses the cold cooling coil, and that water is collected in a drain pan and carried off through a condensate line. The most common failure isn’t the roof at all, it’s a clogged drain line or a missing or undersized P-trap. On draw-through units, the drain pan sits under negative pressure, and without a correctly sized trap the water can’t drain and the pan overflows. That overflow runs down through the curb and looks exactly like a roof leak.
The practical test note the weather every time the stain reappears. Rain correlation points to the flashing or membrane. Runtime correlation in dry weather points to the mechanical system. When you do a water test on the roof, run it with the unit operating, because a pressure-related condensate problem only reveals itself when the fan is on.
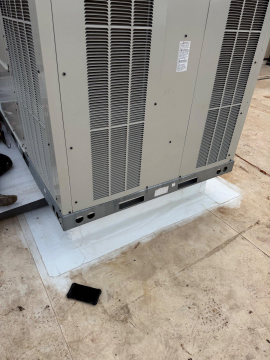
Not every one of these is a misdiagnosis sometimes the condensate problem becomes the roof problem. We got a call on a roof that was genuinely leaking, and when we got up to the unit the cause was sitting right there: the secondary overflow pan was full of standing water and had
been for a long time. The condensate wasn’t draining off the roof the way it should, so it backed up into the pan, the pan stayed full, and over time that standing water worked its way down into the curb and the roof below. The fix wasn’t just sealing a flashing, we cleaned out the affected
area, pulled the old overflow pan, and replaced it so the water had somewhere to go. If we’d only patched the roof and left that pan full, it would have been leaking again by the next cooling season.
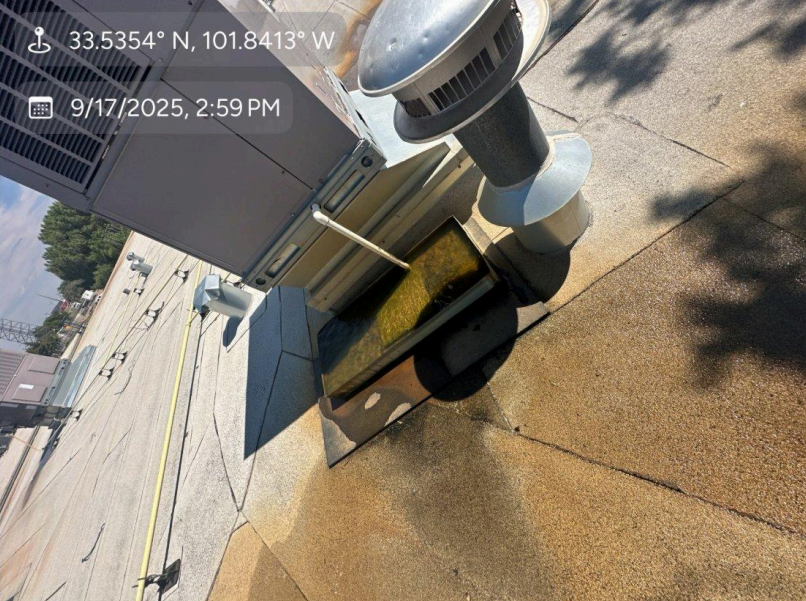
A rooftop unit’s secondary overflow pan full of standing condensate. Left unaddressed, that backed-up water worked its way down into the curb and the roof below a leak that started as a mechanical drainage problem, not a flashing failure.
How do I find the exact source of an HVAC curb leak?
Start at the interior stain and trace straight up to the nearest rooftop unit, then inspect that curb’s corners, seams, and fasteners first. Flashings and penetrations are where leaks concentrate by some estimates nearly nine in ten roof leaks occur at flashings and penetrations rather than in the open field.
Water rarely enters directly above where it appears inside. On a low-slope roof it can travel laterally along the deck or between insulation layers before it finds a path down, so the interior stain is a starting clue, not a map. Once you’re at the unit, work the high-risk spots in order: the corner laps, the termination at the top of the base flashing, the fasteners holding the counterflashing, any pitch pans, and the low area behind the unit where water ponds.
Confirm before you cut. A controlled water test isolating one section of the curb at a time and flooding it while someone watches the interior – tells you which side is actually failing instead of
guessing. Photograph everything; the photos pay off when you scope the repair and when you document it for the building owner.
From the field:
We got a call on a retail tenant space in Lubbock where we’d installed the roof just over a year earlier. There was staining on the ceiling tile below, and the assumption was that our workmanship had failed. We went back out and checked our own details first they were sound. Tracing the stain up to its real source, we found a pipe that had been cut into the side wall after our work, by a handyman, and never properly flashed. He’d just packed the gap with spray foam. The foam had broken down, the substrate around the penetration had already rotted and rusted, and someone had run conduit through the same open hole. The water wasn’t coming through our roof at all, it was pouring in around an unsealed wall penetration nobody had told us about. That’s why we document the roof at handoff and rule out added penetrations before we ever assume a flashing has failed.
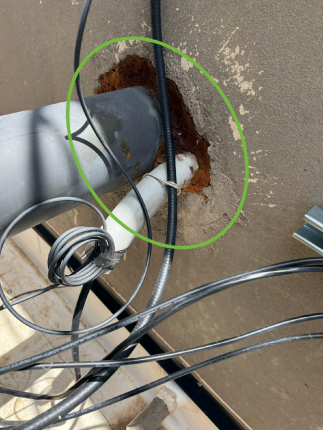
A wall penetration cut in by a handyman after the roof was installed sealed with nothing but spray foam that has since broken down, leaving the substrate rotted and rusted around the pipe. The interior stain below was blamed on the roof; the real source was this unflashed, foamed-over hole.
What are the most common HVAC curb flashing failures?
The most common HVAC curb flashing failures are ponding water behind the unit, failed or missing counterflashing, separated or popped seams, fasteners loosened by unit vibration, and curbs left too short. In our West Texas market, ponding is the one we see most and it almost always traces back to how the roof was built, not the flashing itself. Each failure leaves a sign you can read from the roof.
A short curb is a quieter problem than it sounds. Base flashing should rise a minimum of eight inches above the finished roof surface, and that height frequently disappears when a roof is re-covered and new insulation raises the surface around an existing curb. The table below maps each failure to what you’ll see and how it’s typically corrected, ordered by how often it actually drives callbacks here.
| Failure | What you’ll see on the roof | Likely fix |
| Ponding behind the unit | Standing water, dirt rings, and blisters behind the curb | Correct the slope with proper tapered insulation — not just a cricket patch over a roof that was never built to drain |
| Failed / missing counterflashing | Dried, cracked sealant; a gap at the top of the base flashing | Install or reset a metal counterflashing cap; the outcome depends heavily on how it was detailed in the first place |
| Separated / popped seams | Open or curling seam at a curb corner or in the field near the penetration; staining below | Rebuild the seam and corner detail with new membrane and reinforcement |
| Vibration-loosened fasteners | Backed-out screws, rust trails, loose counterflashing | Re-secure or replace fasteners; re-seat the counterflashing |
| Curb too short (under 8″) | Flashing terminates low; water gets behind it in heavy rain | Raise the curb or rebuild the flashing to the 8-inch minimum |
One thing owners rarely know
The sealant or caulk around a penetration usually isn’t covered under the membrane manufacturer’s warranty — it’s considered a maintenance item. So when a leak traces back to dried-out caulk at a pipe or curb, that repair often falls on the owner, not the warranty. It’s a small line item that’s easy to stay ahead of with regular inspection and an expensive surprise if you don’t.
How do you fix an HVAC curb flashing leak properly?
A proper HVAC curb flashing repair strips all failed material down to a sound substrate, rebuilds the base flashing to at least eight inches, and re-secures compatible counterflashing not another layer of caulk over an old patch. Stacking patch on patch is how a curb keeps leaking after it’s supposedly been fixed.
The sequence matters. Remove loose flashing, brittle membrane, and old patch layers back to sound material. If the insulation underneath is saturated, replace those wet sections sealing over wet insulation just traps the problem and keeps degrading the deck. Rebuild the membrane tie-in and corner detailing, then terminate and secure the flashing properly. Use only materials the membrane manufacturer approves as compatible, because an incompatible patch won’t bond and will fail at the adhesion line.
Finish the counterflashing the same working day. A recognized best practice is to install base flashing and counterflashing within the same day so moisture can’t get in behind an exposed termination overnight. If that isn’t possible, the top edge needs a temporary waterproof seal until the cap goes on.
Before and After:
Here’s what a real repair looks like versus a patch. We were called to a rooftop unit where the curb detail had failed and it hadn’t failed because of bad material. It failed because nobody had been up there. Debris and dirt had packed in around the base, water sat in it, and the old flashing rusted and rotted out from underneath. Somewhere along the way someone had thrown
a metal patch over part of it, and that patch had split right at the seam buying a season, then leaking again. We didn’t add another layer on top. We stripped the failed flashing all the way down to sound material, cleaned out the curb base, and rebuilt the detail with new membrane wrapped up the curb and properly terminated at the unit. The difference between those two photos isn’t just cosmetic the first one was always going to keep leaking, and the second one is built to shed water and actually be maintained going forward.
BEFORE
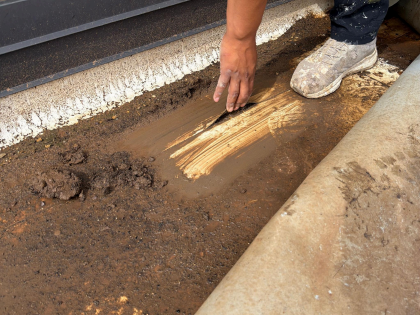
The failed curb detail before repair — debris packed in at the base, the original flashing rusted and rotted out, and an old metal patch that had split at the seam. This didn’t fail from bad material; it failed from a lack of routine maintenance.
AFTER
The same curb after we stripped it to sound material and rebuilt the detail new membrane wrapped up the curb with clean corners and a proper termination at the unit.
When is it a simple repair versus rebuilding or raising the curb?
Reseal when the flashing is structurally sound but the surface seal has aged; rebuild the tie-in when laps have separated or the membrane has gone brittle; and raise the curb when re-roofing has buried it below the minimum flashing height. The right call depends on how much sound material is left.
The buried-curb situation is common and easy to miss. A building gets re-roofed, several inches of new insulation go down, and a curb that used to stand twelve inches tall now clears the surface by only a few — dropping below the eight-inch minimum that flashing needs to shed water reliably. When a new HVAC unit goes in on that curb, this is the moment to extend it rather than flash a curb that’s too short. Resealing a structurally inadequate curb just buys a season.
How do you stop HVAC curb leaks from coming back?
You stop repeat HVAC curb leaks by keeping foot traffic off the detail, inspecting on a schedule, coordinating HVAC and roofing work, and keeping new penetrations grouped and well clear of the curb. Most curb leaks are maintenance failures, not material failures.
Service traffic is the hidden culprit. Technicians kneel, drag tools, and set conduit right at the curb base, scuffing membrane and loosening flashing over time. Walk pads and defined service paths route that traffic away from the vulnerable lines. When new rooftop work is planned, group penetrations together and keep them at least two feet away from walls and vertical surfaces so each detail can actually be flashed and later maintained. And fix the conditions that caused the failure, if water ponds behind a unit, add a cricket to move it off, instead of re-flashing into the same puddle.
A scheduled maintenance program catches backed-out fasteners and dried sealant while they’re a five-minute fix, not a soaked deck.
How we handle this at Core Commercial Roofing:
The repair above is the whole argument for staying ahead of this. That curb didn’t fail because of bad material, it failed because nobody was getting up on the roof. We offer preventative maintenance plans scaled to where the roof is in its life: a roof at year 10 of a 20-year system gets a different plan than one that’s only two years old, because they need different things. We also handle leak repairs, and we typically build a maintenance option right into the original package so the building owner can lock it in from day one. The curbs and penetrations are exactly what those visits catch a backed-out fastener or a debris-packed curb base is a five-minute fix when you find it early, and a soaked deck when you don’t.
Should you DIY this or hire a commercial roofer?
Hire a commercial roofer for anything beyond tightening one obviously loose fastener. Cutting or patching near a curb with the wrong product can void your roof warranty and trap moisture under the membrane, and curb flashing is a layered system rather than a sealant job.
Two risks make DIY a poor bet on a commercial roof. First, warranties: cutting into the membrane or using non-approved materials commonly voids manufacturer and workmanship warranties, which can turn a small leak into an uninsured tear-off. Second, compatibility: a repair only holds if the patch chemistry matches what the membrane manufacturer has approved, and the typical hardware-store sealant isn’t it. A qualified roofer also coordinates with the HVAC contractor so the next service call doesn’t undo the repair.
Frequently asked questions
How much does it cost to fix an HVAC curb flashing leak?
Costs vary widely with the roof system, the size of the failure, and whether wet insulation has to be replaced. A simple reseal and counterflashing reset is modest; a full corner rebuild with insulation replacement costs considerably more, which is exactly why early detection saves money.
How often should commercial roof curbs be inspected?
Twice a year is the common recommendation typically spring and fall plus an extra look after any major storm. Curbs that see frequent HVAC service traffic justify more frequent checks, since that traffic is what loosens flashing in the first place.
Can HVAC curb flashing be repaired in cold weather?
It can, but adhesives and cements have temperature floors flashing cement is generally workable only down to about 25°F, and most adhesives need temperatures above 40°F. A reputable contractor either works within those limits or uses a temporary seal until conditions allow a permanent repair.
Who’s responsible the HVAC company or the roofer?
It depends on the source: the roofer owns the flashing and membrane, while the HVAC contractor owns the unit, drain pan, and condensate line. The cleanest outcomes come when both coordinate, because the curb is literally the seam where their two systems meet. The same goes for any trade adding rooftop work after the fact as one of the jobs above shows, a pipe cut in by an unqualified handyman and never properly flashed will leak just as surely as a failed curb, and it’s rarely the roof that’s actually at fault.