Roofs take a beating that most of the country never sees. Scorching heat, sudden hailstorms, and powerful winds hit hard, and they hit often. The South Plains around Lubbock sits in one of the most active hail corridors in the United States, with the National Weather Service documenting golf-ball to softball-sized hail events across the region every spring season. Over time, even the smallest weakness compounds into leaks, structural rot, and repairs that cost far more than they should. One method we always find incredibly effective is a roof storm damage inspection right after severe weather, because that’s when hidden problems are most likely to show up. Catching them early is the difference between a minor repair and a full replacement. Here are six practical DIY techniques any Texas property owner can use to stay ahead of the weather.
Table of Contents
- Technique 1: Ground-Level Visual Check and Post-Storm Walkthrough
- Technique 2: Check Flashing Around Chimneys, Vents, and Skylights
- Technique 3: Gutters and Drainage Tell the Full Story
- Technique 4: Attic Check for Moisture and Hidden Leaks
- Technique 5: Watch Your Energy Bills for Roofing Red Flags
- Technique 6: Document Everything for Your Roof Damage Report
- When to Call for a Professional Inspection
- Prevention Tips for Texas Roofs
- FAQs
Technique 1: Ground-Level Visual Check and Post-Storm Walkthrough
Walk the perimeter of your building before you ever touch a ladder. This single step catches the most obvious problems without any safety risk, and in Texas, it’s worth doing the morning after any significant storm.
What to look for:
- Missing or misaligned shingles: storm winds can lift or strip shingles entirely, leaving the deck exposed
- Dark patches or streaking: signals algae growth, moisture intrusion, or accelerated shingle aging from UV exposure
- Sagging rooflines: a drooping section points to water damage or structural stress underneath
- Debris field around the building: fallen shingles, torn flashing pieces, or granule piles on the ground all indicate impact or wind damage above
On commercial flat roofs, add one more item: look for displaced gravel ballast or bubbled membrane sections visible from the roofline edge.
Why it matters: West Texas storms can hit fast and hard. The National Weather Service Lubbock office documents hail events across the South Plains every active season, with golf-ball to softball-sized hailstones regularly recorded from March through June. A quick ground-level check right after a storm catches the most urgent damage before it has time to worsen.
Pro tip: Use a camera with a zoom lens or binoculars to get a close-up look at the roof surface while keeping both feet on the ground.
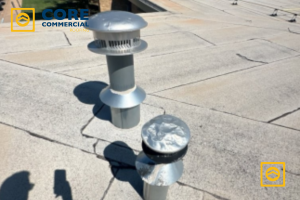
Technique 2: Check Flashing Around Chimneys, Vents, and Skylights
Flashing is the thin metal barrier that seals every joint where your roof meets a vertical surface, such as a chimney, vent pipe, skylight frame, or parapet wall. It’s one of the most common leak sources we find on both residential and commercial roofs in West Texas.
Extreme heat causes metal flashing to expand and contract repeatedly through the day. Over time, that movement loosens the seal, creates gaps, and invites water in. On commercial buildings, HVAC curb flashing deserves particular attention, since rooftop units are heavy, vibrate constantly, and work the surrounding membrane hard.
Signs of trouble:
- Rust or corrosion spots on the flashing metal
- Visible gaps where flashing meets brick, vent pipes, or skylight frames
- Water stains on interior ceilings directly below any of these features
- Daylight visible around vent bases when viewed from inside the attic
Why it matters: Damaged or loose flashing is one of the leading causes of commercial roof leaks. A full roof damage assessment should always include a flashing check from both outside and inside, not just a quick look at the surface.
Tip: If you see daylight peeking through around a vent base when you’re in the attic, treat it as an active leak risk, not a minor cosmetic issue.
Technique 3: Gutters and Drainage Tell the Full Story
It’s easy to think of gutters as separate from the roof, but they’re part of the same water management system. Problems here almost always trace back to roof damage above.
What to inspect:
- Shingle granules in the gutters: granules look like coarse black sand, and finding them in the gutter after a storm is a direct indicator of shingle wear or hail impact. Hail loosens the protective granule layer and gravity carries those granules down to the gutter and downspout ends.
- Sagging or detached gutter sections: heavy debris or ice load can pull gutters away from the fascia, which redirects water behind the fascia board instead of away from the building
- Downspouts discharging freely: blocked downspouts back water up under roofing materials, accelerating rot and leak formation
- Ponding water on flat or low-slope roofs: flat commercial roofs should drain completely within 48 hours of rainfall. Water sitting longer than that adds structural load and breaks down membrane materials faster.
Why it matters: For any complete roof damage report, note all gutter and drainage issues, because they’re usually downstream symptoms of roof problems above. On commercial flat roofs, especially, failed drainage is a system-level problem, not a maintenance shortcut.
Technique 4: Attic Check for Moisture and Hidden Leaks
Some of the most serious roof problems are invisible from the outside. A roof that looks intact from the ground can be quietly soaking up insulation, rotting decking, and growing mold. The attic is where you find what the exterior hides.
This is a step worth doing after every major storm, and at minimum twice a year in line with what the National Roofing Contractors Association recommends for routine inspection schedules.
What to look for:
- Damp or compressed insulation, especially in localized spots that point to a specific entry point above
- Dark staining or soft spots on wooden rafters and decking
- Mold or mildew growth, which indicates ongoing moisture, not just a one-time event
- Sunlight visible through the roof boards, which confirms a gap or crack in the deck
- Water trails on rafters, which track from the entry point horizontally before dripping, meaning the actual leak source is often several feet from where the stain appears
Why it matters: Moisture in the attic means water is penetrating your roof system, and it compounds quickly in Texas heat and humidity. What starts as a small wet patch in insulation can become structural rot and mold remediation within a single season.
Safety note: Wear gloves and a dust mask when working in an attic, especially in older buildings where insulation materials may be irritating.
For more targeted fixes once you’ve identified a problem, see these practical solutions for low-cost commercial roof repairs in Texas.
Technique 5: Watch Your Energy Bills for Roofing Red Flags
A spike in cooling costs, especially during a Texas summer, is sometimes the first measurable sign of a roof problem. This one doesn’t require a ladder or a flashlight. It shows up on your monthly statement.
What drives the connection:
- Damaged or displaced insulation from roof leaks reduces thermal resistance, making your HVAC work harder to maintain set temperatures
- Gaps or open seams in the roof membrane allow hot attic air to bleed into conditioned space, adding load to the cooling system
- Poor or blocked attic ventilation traps heat, which radiates down through the ceiling and raises the indoor temperature
Why it matters: When a cooling bill climbs without a change in weather or usage patterns, the roof is worth investigating before assuming the HVAC system is the problem. Catching the underlying roof issue early saves money on both the repair and the ongoing energy waste.
What to do: If your bills have risen month over month without a clear explanation, run through techniques 4 and 2 before calling your HVAC company. A 10-signs your commercial roof needs a re-roof check can also help you determine whether the issue is isolated or systemic.
Technique 6: Document Everything for Your Roof Damage Report
If you find damage during any of the five steps above, how you record it matters as much as finding it. Clear documentation is what makes an insurance claim move forward and what gives a professional inspector the context to recommend the right repair.
Best practices:
- Photograph from multiple angles, including close-ups of the damage and wider shots that establish the location on the building
- Note the exact location (e.g., “northwest corner, near HVAC curb,” or “flashing at the south-facing vent stack”) so anyone reading the report can find it without searching
- Date-stamp everything, either through your phone’s automatic metadata or a written log entry
- Keep a running inspection log, not just single-event photos. A dated record of before-and-after conditions strengthens an insurance claim considerably and helps a contractor understand whether damage is recent or progressive
A thorough roof damage report speeds up insurance claims, reduces disputes over causation, and helps roofing professionals recommend targeted repairs rather than guessing from scratch.
When to Call for a Professional Inspection
DIY inspections are a valuable first line of awareness, but they have clear limits. Call a professional when:
- You find any active leak, pooling water on a flat roof, or open flashing gap
- Your attic shows signs of ongoing moisture, not just a single wet event
- A storm dropped golf-ball or larger hail, since granule damage and membrane bruising are not always visible without close inspection
- It’s been more than six months since a qualified inspector looked at the roof
For commercial flat roofs, the stakes are higher. A slow TPO seam failure or a saturated insulation layer under an otherwise intact membrane won’t show up in a ground-level check. Professional inspectors using moisture detection methods during a comprehensive roof report can find those problems before they reach the interior. Early commercial roof repairs are always significantly less expensive than emergency interventions or full replacements.
Prevention Tips for Texas Roofs
- Schedule inspections at minimum twice a year, in spring and fall, plus immediately after any hail or high-wind event
- Trim tree branches that overhang the roof to reduce debris accumulation and impact risk
- Clean gutters and flat-roof drains regularly to maintain unobstructed drainage
- Keep an updated inspection log and photograph your roof annually so you have a baseline condition record before damage occurs
- Know your insurance coverage for storm damage and confirm whether it requires documented evidence of pre-storm condition
Conclusion
Roof damage in Texas isn’t a question of if, it’s a question of when. Lubbock and the surrounding South Plains see some of the most frequent and severe hail in the country, and no roofing material is immune to repeated impact, UV exposure, and wind stress over time. The six techniques above won’t replace a professional inspection, but they’ll give you an early warning system that catches problems when they’re still inexpensive to fix. Whether you’re watching over a single-family home or a commercial roofing system across multiple buildings, a proactive inspection habit is the most cost-effective roofing decision you can make.
FAQs
How do I check my roof for storm damage in Texas?
Walk the perimeter immediately after the storm to look for downed shingles, granule piles near downspouts, and damaged flashing. Then check the attic for water stains, damp insulation, or visible daylight through the decking. If you find anything, photograph and document it before calling a professional.
What are the signs of hail damage on a Texas roof?
Hail damage typically shows as dents or dings on metal components like vents and flashing, a sudden increase in granules collecting at downspout ends, and dark bruise marks or cracked shingles on the field of the roof. On flat commercial roofs, look for pockmarks in the membrane or displaced ballast gravel.
How can I tell if my roof has wind damage?
Look for lifted, curled, or missing shingles along the edges and ridgeline, since wind damage usually starts at transitions and perimeters. Inside, check ceilings and attic rafters for new water staining that wasn’t there before the storm.
How often should I inspect my roof in Texas?
At a minimum, twice a year, in spring and fall, and after any significant storm. The NRCA recommends this schedule for both residential and commercial buildings, and in high-hail regions like West Texas, it’s worth adding a post-storm walkthrough to your routine from March through June.
Can I inspect my roof without climbing on it?
Yes. A ground-level walkthrough with binoculars handles the majority of visual warning signs. Pair that with an attic check from inside, and you’ll catch most active problems without setting foot on the surface. For anything that requires closer inspection, hire a professional rather than taking the fall risk.
What tools do I need for a DIY roof inspection?
Binoculars or a zoom-capable phone camera for the exterior, a flashlight for the attic, gloves and a dust mask for the attic interior, and your phone for dated photos. A basic notepad or note-taking app to log locations and observations rounds out the toolkit.