Metal roofing is one of the most durable, energy-efficient, and low-maintenance roofing options available today. If you’re a homeowner looking to replace an old roof or undertake a new construction project, learning how to install metal roofing correctly can save you time, money, and future headaches. This step-by-step guide is written in simple language, making it easy even for 8th-grade readers to understand. We’ll walk you through everything, from gathering tools to sealing the last panel, so you can complete the job with confidence.
Whether you’re trying to improve your home’s protection from the elements, boost curb appeal, or save money in the long run, this article is designed to help beginners take action with clarity
Table of Contents
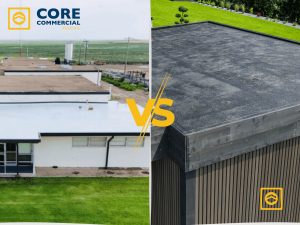
What Is Metal Roofing and Why Install It?
Metal roofing is made from steel, aluminum, copper, or zinc and is designed to last 40 to 70 years with minimal upkeep. It resists fire, wind, hail, mold, and rot.
The answer is usually a resounding yes, especially if you live in areas with extreme heat, heavy rainfall, or frequent storms.
Benefits of metal roofing:
- Long-lasting (40–70 years, depending on material)
- Lightweight, reducing stress on your home’s structure
- Reflects heat, lowering summer cooling costs
- Eco-friendly – often made of recycled materials and 100% recyclable
- Low maintenance compared to shingles or tiles
Tools and Materials You’ll Need for commercial metal roof installation
Here’s a beginner-friendly list of tools and materials you should gather before getting started:
Tools
- Tape measure
- Chalk line
- Drill and driver bits
- Snips or shears (for cutting panels)
- Ladder or scaffolding
- Caulk gun
- Safety harness and gear
Materials
- Metal roof panels (corrugated or standing seam)
- Roofing screws with rubber washers
- Underlayment (synthetic or felt)
- Drip edge
- Flashing
- Ridge caps
- Foam closures (optional)
- Sealant or caulk
Tip: Always order extra materials. Local stores may not carry the exact match later if you run short.
Safety Tips Before You Start
Before you even climb the ladder, remember that working on a roof can be dangerous. A few smart precautions can save your life:
- Use a proper safety harness secured to a stable anchor.
- Avoid installing on windy or rainy days.
- Wear soft-soled shoes for better traction.
- Don’t work alone; always have a partner or spotter.
If you’re unsure about roof pitch or how to walk safely on your roof, consider asking a local contractor for advice.
Measuring and Preparing Your Roof
Accurate measurements are the foundation of a successful installation. Here’s how to do it right:
- Measure your roof’s length and width on each slope.
- Multiply to get the square footage of each section.
- Add 10% to your total to account for waste and cuts.
You’ll also want to check:
- The roof pitch (steepness) is used to choose the correct panel type.
- That your framing and roof decking are solid, no sagging or rot.
Removing the Old Roofing (If Needed)
If you’re replacing an old shingle roof, you’ll need to tear it off first unless your local building code allows installing over existing shingles.
Steps:
- Use a shingle removal tool or roofing shovel.
- Toss debris into a dumpster or trailer.
- Inspect the decking for rot or damage and replace as needed.
Pro Tip: Always remove old flashing and underlayment. Starting fresh prevents leaks later.
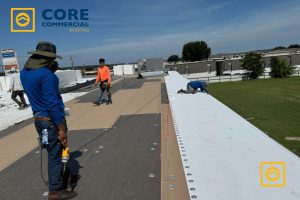
Installing The Underlayment and Flashing
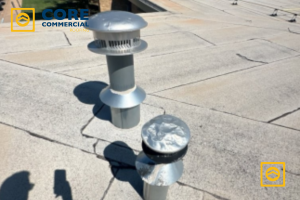
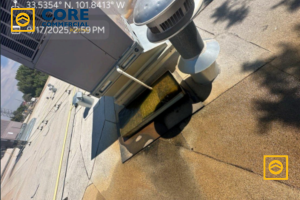
Underlayment is your roof’s second line of defense against leaks. You’ll also install flashing in valleys, around vents, and near roof edges.
How to do it:
- Roll out synthetic or felt underlayment horizontally, starting at the bottom edge.
- Overlap each row by about 4 inches.
- Nail or staple it down per the manufacturer’s instructions.
- Install metal or rubberized flashing in valleys and around roof features.
Laying the First Panel
Start at the bottom corner of the roof. This first panel sets the tone for your entire project.
Steps:
- Align the bottom edge of the panel with the edge of the roof (including drip edge).
- Use chalk lines for a straight layout.
- Screw through the flat areas (not the ridges) using screws with rubber washers.
- Don’t overtighten; snug is enough.
Adding Remaining Panels and Overlaps
After the first panel is set, continue installing panels by overlapping the edges.
- Overlap by one ridge (corrugated) or use interlocking seams (standing seam).
- Apply a thin bead of sealant where overlaps meet to prevent leaks.
- Fasten each panel as you go, checking for straightness regularly.
- Cut panels as needed near edges or dormers using metal snips or a power shear.
Note: Overlapping correctly and sealing joints keep water out. This is one of the top issues searched: “Why does my metal roof leak at seams?”
Installing Ridge Caps and Closures
Once the panels are in place, it’s time to seal the roof peak with ridge caps.
Here’s how:
- Place foam closures along the ridge line (optional but great for weatherproofing).
- Lay ridge caps over the ridge, covering both sides of the roof evenly.
- Secure with roofing screws on each side, 12–16 inches apart.
This step not only protects against rain and snow but also improves the roof’s appearance.
Sealing, Fastening, and Final Checks
Your roof may look done but now’s the time to double-check every detail:
- Ensure all screws are tight but not overdriven.
- Add sealant around flashing, vents, and chimney bases.
- Check for gaps at panel ends, edges, or joints.
- Clean off metal shavings to prevent rust.
Local tip: If you live near the coast or in a high-snow zone, you may need to apply extra sealant or use thicker gauge panels.
Common Mistakes to Avoid
Even DIYers with the best intentions make a few errors. Avoid these beginner mistakes:
- Skipping the underlayment – this can cause leaks over time.
- Improper screw placement – too few screws or driving through ridges leads to panel lifting.
- Inconsistent panel spacing – misaligned panels make the roof look unprofessional.
- Ignoring edge flashing – this often leads to water damage inside the walls.
Final Thoughts and Long-Term Care Tips
Congratulations! If you’ve followed this guide, you now have a professionally installed metal roof that will last for decades.
To keep it in top shape:
- Clean gutters regularly.
- Inspect the roof each season and after major storms.
- Touch up scratches with manufacturer-approved paint.
- Re-caulk flashing every few years.
Metal roofing is a long-term investment. By learning how to install metal roofing step by step, you’ve not only saved thousands in labor costs, but you’ve also boosted your home’s durability and value.
Want to install metal roofing in your area?
If you’re looking for more guidance, help sourcing materials, or hands-on assistance, search locally for commercial roofing in Lubbock, TX to find nearby resources. Or visit your local hardware store and ask for metal roof installation kits for beginners.
This guide is here to empower you, from the first screw to the final ridge cap. You’ve got this.
FAQs
How do I install a metal roof step by step?
To install a metal roof, begin by removing the old roofing materials and inspecting the roof deck for any damage. Install underlayment to protect against moisture, then place metal panels from the bottom up, overlapping edges. Secure panels with appropriate fasteners, add flashing around protrusions, and finish with ridge caps to seal the roof’s peak.
Can I install metal roofing over existing shingles?
Yes, installing metal roofing over existing shingles is possible if local building codes allow it. Ensure the roof structure can support the additional weight, and use appropriate underlayment to prevent moisture issues. This method can save time and labor costs.
What tools do I need to install metal roofing?
Essential tools include a tape measure, chalk line, metal snips, drill with driver bits, safety harness, ladder, and appropriate fasteners. Having these tools ready ensures a smoother installation process.
How do I measure my roof for metal panels?
Measure the length and width of each roof section to calculate the area. Multiply length by width for each section, then add the areas together. Include an extra 10% to account for waste and overlaps. Accurate measurements ensure you order the correct amount of materials.
What is the best underlayment for metal roofs?
Synthetic underlayment is often recommended for metal roofs due to its durability and resistance to moisture. It provides a protective barrier between the metal panels and the roof deck, enhancing the roof’s longevity.
How do I install flashing on a metal roof?
Install flashing at roof intersections, valleys, and around protrusions like chimneys and vents. Cut the flashing to fit, slide it under the metal panels, and secure it with appropriate fasteners. Proper flashing installation prevents water infiltration.
How do I install ridge caps on a metal roof?
Place foam closures along the roof ridge to seal gaps, then position the ridge cap over the closures, ensuring it overlaps the metal panels evenly on both sides. Secure the ridge cap with screws at recommended intervals to protect the roof’s peak from water intrusion.
What are common mistakes when installing metal roofing?
Common mistakes include improper panel alignment, over-tightening screws, neglecting to use underlayment, and inadequate flashing installation. These errors can lead to leaks and reduced roof lifespan. Following manufacturer guidelines helps avoid these issues.
How do I maintain a metal roof after installation?
Regular maintenance includes inspecting for loose fasteners, cleaning debris from the roof surface, and checking for signs of corrosion or damage. Promptly addressing issues ensures the roof remains in good condition and extends its service life.
Is DIY metal roof installation suitable for beginners?
While DIY metal roof installation is possible for those with basic carpentry skills and proper safety precautions, it’s important to thoroughly research the process and understand the complexities involved. Consulting professional guides and considering assistance for challenging aspects can lead to a successful installation.